Warm Window & Door Installation
Overview
Page 01 / 03Windows and doors are the most sensitive points in the envelope because they combine glass, frame, structure, movement, water protection and airtightness in one detail.
A high-quality window installed badly is not a high-performance window in the building. The product label usually describes the window unit, but the real building performance depends on the installed condition: where the frame sits in the wall, how the support is insulated, how airtightness is sealed, how water is drained and how the exterior facade layer protects the joint. This is why the “warm installation” page should be direct: the opening detail is where many energy projects fail.
Why this belongs on the site
Many clients understand windows as a purchase decision: double or triple glazing, brand, frame colour and price. The website should educate them that installation is part of performance. A passive-house-oriented wall deserves a window detail that does not cut the thermal envelope.
PHB advantage
Because Passive House Block already organizes insulation and structure as a wall system, the window detail can be designed as part of the wall logic. The frame can be positioned to reduce thermal bridging and keep the airtight line intentional.
Warm Mounting
Page 02 / 03Warm mounting is not one product. It is a coordinated detail with position, support, insulation and sealing layers.
What to show visually
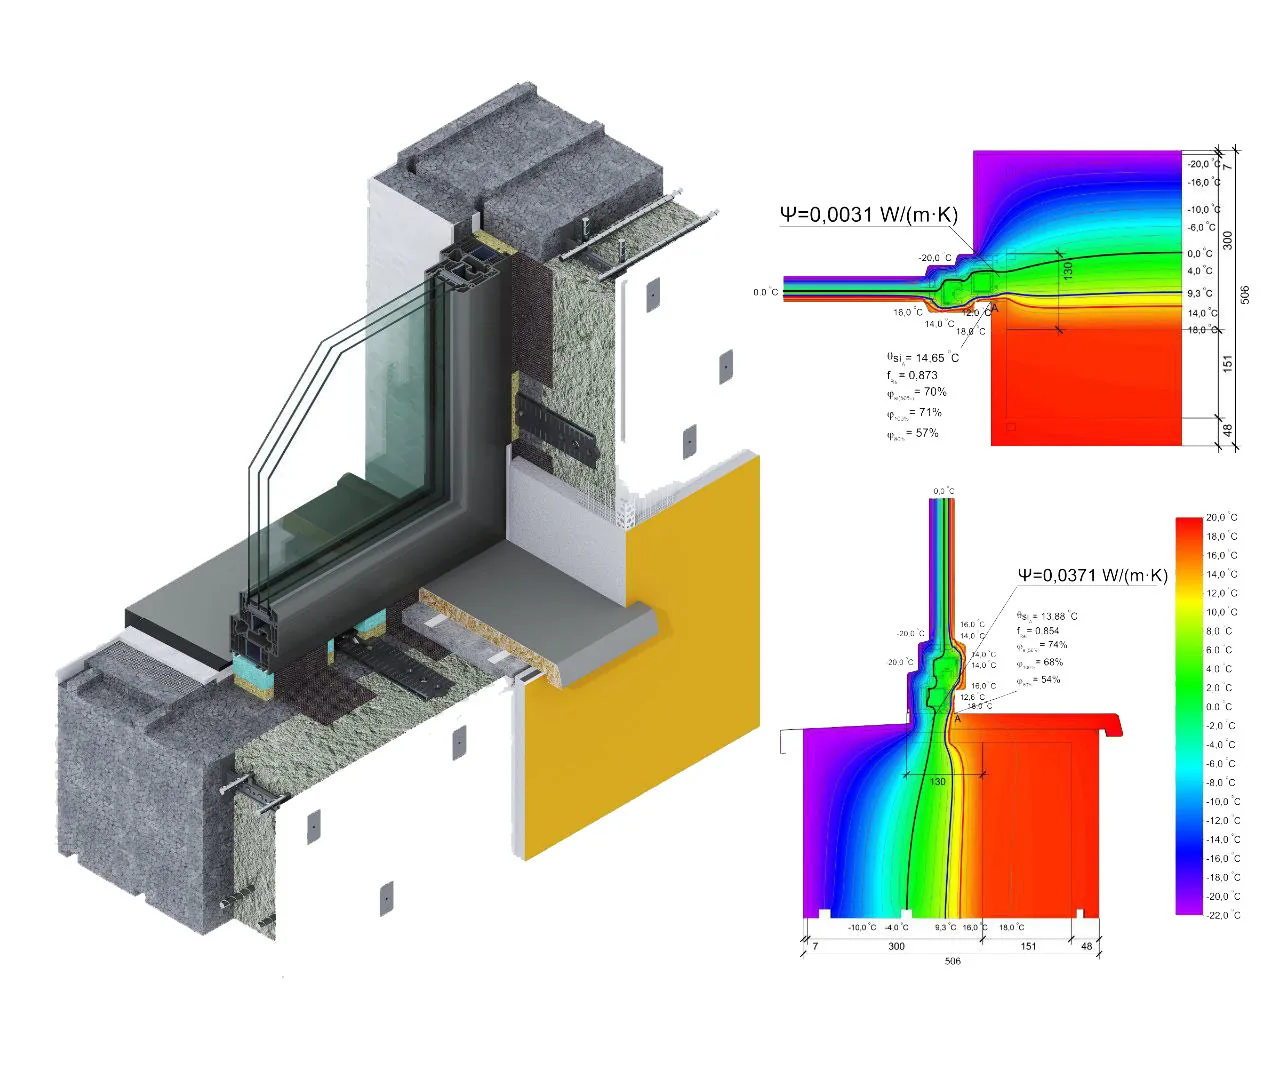
Use a clean cutaway image: wall insulation, concrete core, window frame, tapes, support profile and exterior facade layer. It should look like a simple build-up, not a messy construction detail.
What to avoid
Avoid saying “triple glazing solves the envelope.” It does not. The installation junction can erase part of the window value if the frame sits in a cold line or if the airtight layer is broken.
Site Control
Page 03 / 03The site checklist should make warm installation feel manageable instead of exotic.
Before installation
- Confirm window schedule, frame depth and Uf / Uw data.
- Confirm rough opening dimensions and tolerances.
- Confirm frame position relative to insulation plane.
- Confirm tape, membrane, support and sill strategy.
- Check shading, water drainage and facade compatibility.
During installation
- Protect the frame from twisting and point loads.
- Seal interior airtight layer continuously.
- Insulate the perimeter gap without voids.
- Protect exterior side against rain and UV exposure.
- Photograph hidden layers before closure.
After installation
Use site inspection and, when required, blower-door testing to verify that the opening does not become an air-leakage path. The earlier the test happens, the easier and cheaper corrections are.
Client benefit
Warm installation protects comfort at the weakest points: less condensation risk, fewer draughts, better acoustic feeling, more stable interior surface temperatures and a better return on high-quality windows.


More Tech Lab articles.
Dew Point Explained
Condensation risk, wet insulation behaviour and why internal wall insulation needs special care.
Read article
 Passive House Block Walls
Exterior insulation, reinforced concrete core and the build logic behind the main wall system.
Read article
Passive House Block Walls
Exterior insulation, reinforced concrete core and the build logic behind the main wall system.
Read article
 Continuous Thermal Envelope
How insulation, airtightness and thermal-bridge control stay continuous around the building.
Read article
Continuous Thermal Envelope
How insulation, airtightness and thermal-bridge control stay continuous around the building.
Read article