Dew Point Explained

Condensation control depends on warm surfaces, correct wall build-up and reliable air exchange before moisture becomes mould risk.
Dew Point
Page 01 / 04The dew point is not the defect. The defect is allowing dew-point conditions to occur on a cold surface or inside a hidden layer that cannot dry safely.
The dew point is the temperature at which water vapour in air begins to become liquid water. In a building wall, the question is not whether dew point exists somewhere in the calculation. The question is where that critical condition falls, how often it occurs and whether the material can tolerate and dry the moisture.
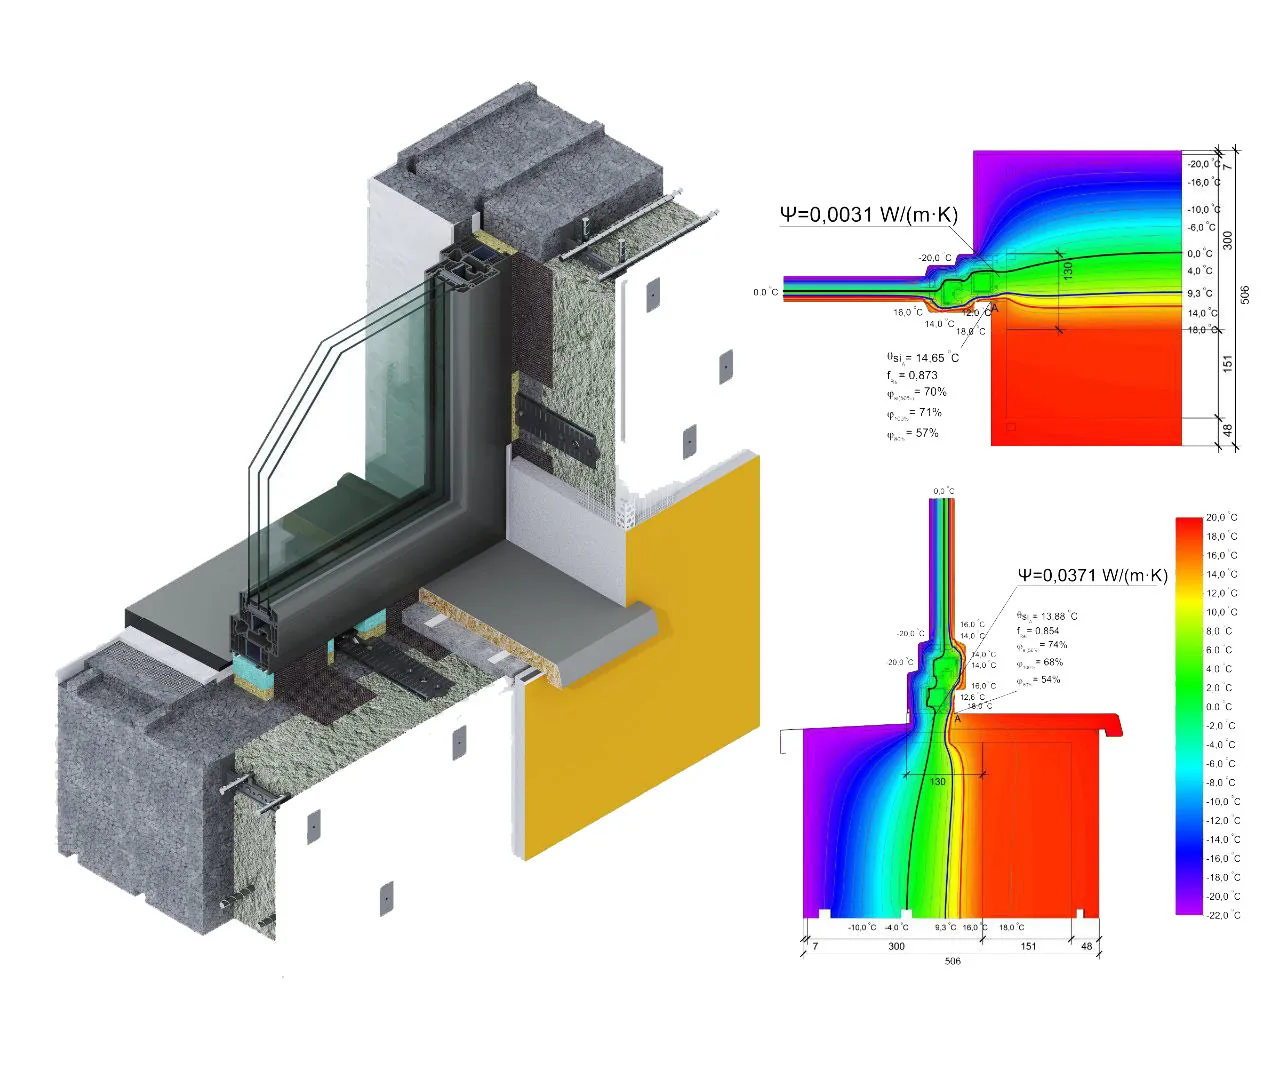
If the envelope is poorly insulated, interrupted by thermal bridges, leaky to indoor air or under-ventilated, some surfaces can become too cold. Corners, window reveals, slab edges, roof-wall junctions and hidden interfaces behind insulation are especially sensitive.
This is why insulation continuity matters. A well-designed exterior insulation strategy helps keep the structural wall and interior surfaces warmer and more stable, reducing the chance that condensation forms where it is hard to see, dry or repair.
Why it matters to monitor
Moisture risk usually grows before it is visible. The usual causes are a wrong wall build-up and insulation strategy, and insufficient room ventilation / air exchange. Tracking temperature, indoor humidity and cold junctions gives time to correct these details before damp surfaces become mould conditions.
Condensation
Cold surfaces can collect moisture when indoor air reaches dew-point conditions near the surface or inside a layer.
Mould risk
Persistent dampness creates conditions where mould can grow, especially in corners, reveals and poorly ventilated areas.
Lower insulation performance
Wet insulation can perform worse than dry insulation and make the wall less predictable than the design calculation.
Finish and layer damage
Repeated moisture cycles can damage plaster, paint, boards, fixings and hidden layers before the issue is visible.
Material Risk
Page 02 / 04Dew point becomes dangerous when the material around it can hold water, lose thermal resistance or pass moisture deeper into the structure.
External insulation is not only about moving the temperature drop outward. The material itself matters. Some insulation types resist liquid water and recover more predictably, while fibrous or porous materials can lose performance quickly when moisture is trapped inside them.
With exterior EPS, graphite EPS or Neopor-type insulation, the critical temperature zone is moved outward into a layer that is not designed to act as a capillary moisture reservoir. The assembly still needs correct joints, render, drainage, flashing and airtightness, but the insulation is less sensitive to temporary moisture than fibrous open insulation.
With mineral wool, wood-fibre boards such as Steico-type insulation or similar vapour-open fibrous materials, the risk logic changes. If installation, airtightness, render, flashing or water protection is wrong, moisture can form or be trapped inside the insulation layer. Once that insulation becomes wet, its thermal resistance can drop sharply.
Moisture enters insulation
Air leakage, rainwater, poor render, weak flashing or weak vapour control allows moisture into the layer.
Fibrous insulation gets wet
Mineral wool or wood fibre can hold moisture in its structure when drying is not sufficient.
Thermal resistance drops
The layer conducts more heat and no longer performs like the dry design calculation.
Dew point moves inward
The colder zone can shift back toward the wall surface or into the AAC itself.
Wall becomes wet
AAC can lose thermal and mechanical performance when persistently wet, and hidden mould risk rises.
Internal Insulation
Page 03 / 04Internal insulation is technically possible in selected retrofit cases, but it should be treated as an exception, not the preferred strategy for external walls.
Use a continuous exterior insulation envelope wherever the project allows it.
For new construction and deep retrofit projects, external wall insulation keeps the load-bearing core warmer, protects the structure and makes thermal continuity easier around slabs, corners, window reveals and roof-wall junctions.
Internal wall insulation may look easy because it can be installed from the room side. In building physics, however, it is usually the weaker and more sensitive strategy. The structural wall behind it becomes colder and less connected to indoor warmth.
That colder hidden zone can move the dew-point and condensation risk toward the interface between the insulation and the wall. If warm indoor air leaks into that zone, moisture can form where it is difficult to see, dry or repair.
Colder structural wall
The wall behind the insulation becomes colder and less able to buffer indoor temperature swings.
Hidden condensation risk
Moisture can form behind the insulation or inside the wall assembly, where it is difficult to detect.
More thermal bridges
Floors, partitions, slab edges, corners and window reveals interrupt the insulation layer.
More sensitive detailing
Airtightness, vapour control, sockets, pipes, window reveals and junctions become less forgiving.
When internal insulation may be used
Internal insulation may be considered when exterior insulation is not possible, for example in protected historic buildings, strict facade restrictions or partial retrofit situations. In these cases it must be designed with project-specific hygrothermal assessment, airtightness detailing, vapour-control strategy and ventilation design.
Wall Logic
Page 04 / 04Same wall, different insulation position: exterior-first insulation keeps the core warmer; internal insulation can create a hidden cold interface.
Exterior-first insulation
Main insulation is placed outside the load-bearing concrete core. The wall stays closer to the indoor thermal zone, while the colder part of the temperature drop happens outside the structure.
- Warmer structural core.
- More stable interior surface.
- Lower risk of hidden condensation.
- Better default logic for new construction and deep retrofit.
Related Tech Lab pages
Continue with the main wall-system and continuous-envelope notes to connect moisture safety with product layer logic.
Technical references
Use these as orientation sources. Final design should be checked by the project engineer using the actual wall build-up and climate assumptions.
Visible signs of condensation problems


More Tech Lab articles.
 Passive House Block Walls
Exterior insulation, reinforced concrete core and the build logic behind the main wall system.
Read article
Passive House Block Walls
Exterior insulation, reinforced concrete core and the build logic behind the main wall system.
Read article
 Continuous Thermal Envelope
How insulation, airtightness and thermal-bridge control stay continuous around the building.
Read article
Continuous Thermal Envelope
How insulation, airtightness and thermal-bridge control stay continuous around the building.
Read article
 Warm Window & Door Installation
Installation detail for frames, insulation-line connection and airtight-layer sealing.
Read article
Warm Window & Door Installation
Installation detail for frames, insulation-line connection and airtight-layer sealing.
Read article